Stitch it Up!

Instructions
Preparation
1. Cut Aida cloth into 9” x 12” pieces. Aida cloth is a beautiful even-weave cloth, popular for cross stitch work, crewel embroidery, and other stitchery.

2. Decide on imagery that can be done in black, white, and gray, and think of where pops of color could be added for visual impact.
Process
1. Familiarize yourself with basic embroidery stitches. After deciding on imagery for the painting portion of this project, use a pencil to very lightly sketch it onto the Aida cloth. To easily transfer an image to the cloth, tape the sketch to a bright window or light box and place the cloth over it. Trace.
2. Using acrylic paint and a brush, apply washes of paint to the cloth. The paint goes on very nicely if it is thinned with water. Use black and shades of gray made by mixing black and white. Where pure white is desired, leave the natural color of the Aida cloth. Let the painting dry.
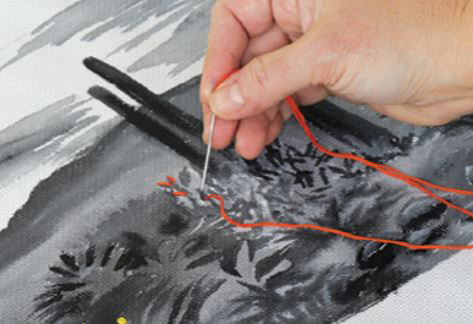
3. Now, begin stitching! The blunt metal needle works perfectly on the cloth using the embroidery floss as packaged without separating strands. Knot one end of the floss, and thread the other through the needle. Only use a length of floss that is easy to work with — no more than 24” at a time.
4. Stitch in pops of colorful accents using traditional embroidery stitches such as the running stitch, back stitch, satin stitch, or a field of French knots. Experiment with the types of texture that can be created with stitching. Do as much or as little embroidery as desired. Invent new ways of stitching!
5. To display, glue edges to the back of a board such as a canvas panel. Or fray the sides by removing rows of thread from the fabric and glue to backing.
Optional Process for use with Paper

1. Follow steps 1 and 2 above.
2. Predetermine where stitching will be placed. Place the painting done on paper onto a piece of Wonderfoam sheet. Using the blunt needle, pre-punch holes for stitching. Finish as above.
Examples of basic embroidery stitches.

(A) Back Stitch - Bring the needle up from the back, pulling the thread through. Take a stitch back and pull the thread through. Make another stitch to the front. Insert the needle at the beginning of the previous stitch. This is a great stitch for outlining.

(B) Split Stitch - Make a back stitch. Put the needle in the middle of the previous stitch, splitting the threads. Pull the thread through and repeat! This is a quick, decorative option for the back stitch.

(C) Stem Stitch - Make a back stitch. Bring the needle up next to the middle of this stitch, then take another stitch to the front. Repeat, continuing to bring the thread up next to the previous stitch. This is the perfect stitch for curved lines.

(D) Satin Stitch - Start with the basic straight stitch. Make a second stich parallel to the first. Continue, always going from one side to the other. This stitch is great to fill in small areas with color.

(E) French Knot - Bring the thread up from the back. Firmly wrap the thread around the needle once (or twice for a double French Knot) then plunge the needle back down through the fabric very close to the point where it came up. Now slowly pull the thread through to the back. This stich is perfect to use for textural effects or as a decorative accent.

(F) Cross Stitch - Make a series of diagonal stitches. Then reverse the diagonal to create a line of decorative x’s.

(G) Lazy Daisy – Bring the needle up, then down right next to that point, leaving a loop of thread. Tac the loop with a small stitch to create a petal shape. Make numerous petals to create a daisy. Finish with a French Knot in the center.
